前言
在之前的文章里,我介绍了我在校内个人服务器的搭建和配置方案,其中我的服务是在一个香港的 VPS 通过 nginx 反代到使用 tailscale 连接的校内实际服务器来实现的对外暴露,但是,这样就会带来一个问题 —— 如果我身处校内,我明明可以直连服务器(校内有线连接的机器都有公网 IP,只是对校外封禁 80、443 端口),但我的流量必须首先从校内转发到 Cloudflare,然后 VPS,最后回到校内,这大大降低了链路稳定性、提高了链路延迟并限制了链路带宽,对于某些服务来说,比如 webdav,会显著影响使用体验。
因此,我需要一个机制能够让所有来自校内的请求直接连接到校内的服务器,而只有来自校外的请求则通过 VPS 中转到校内,理想的线路优化的结果如下图所示:
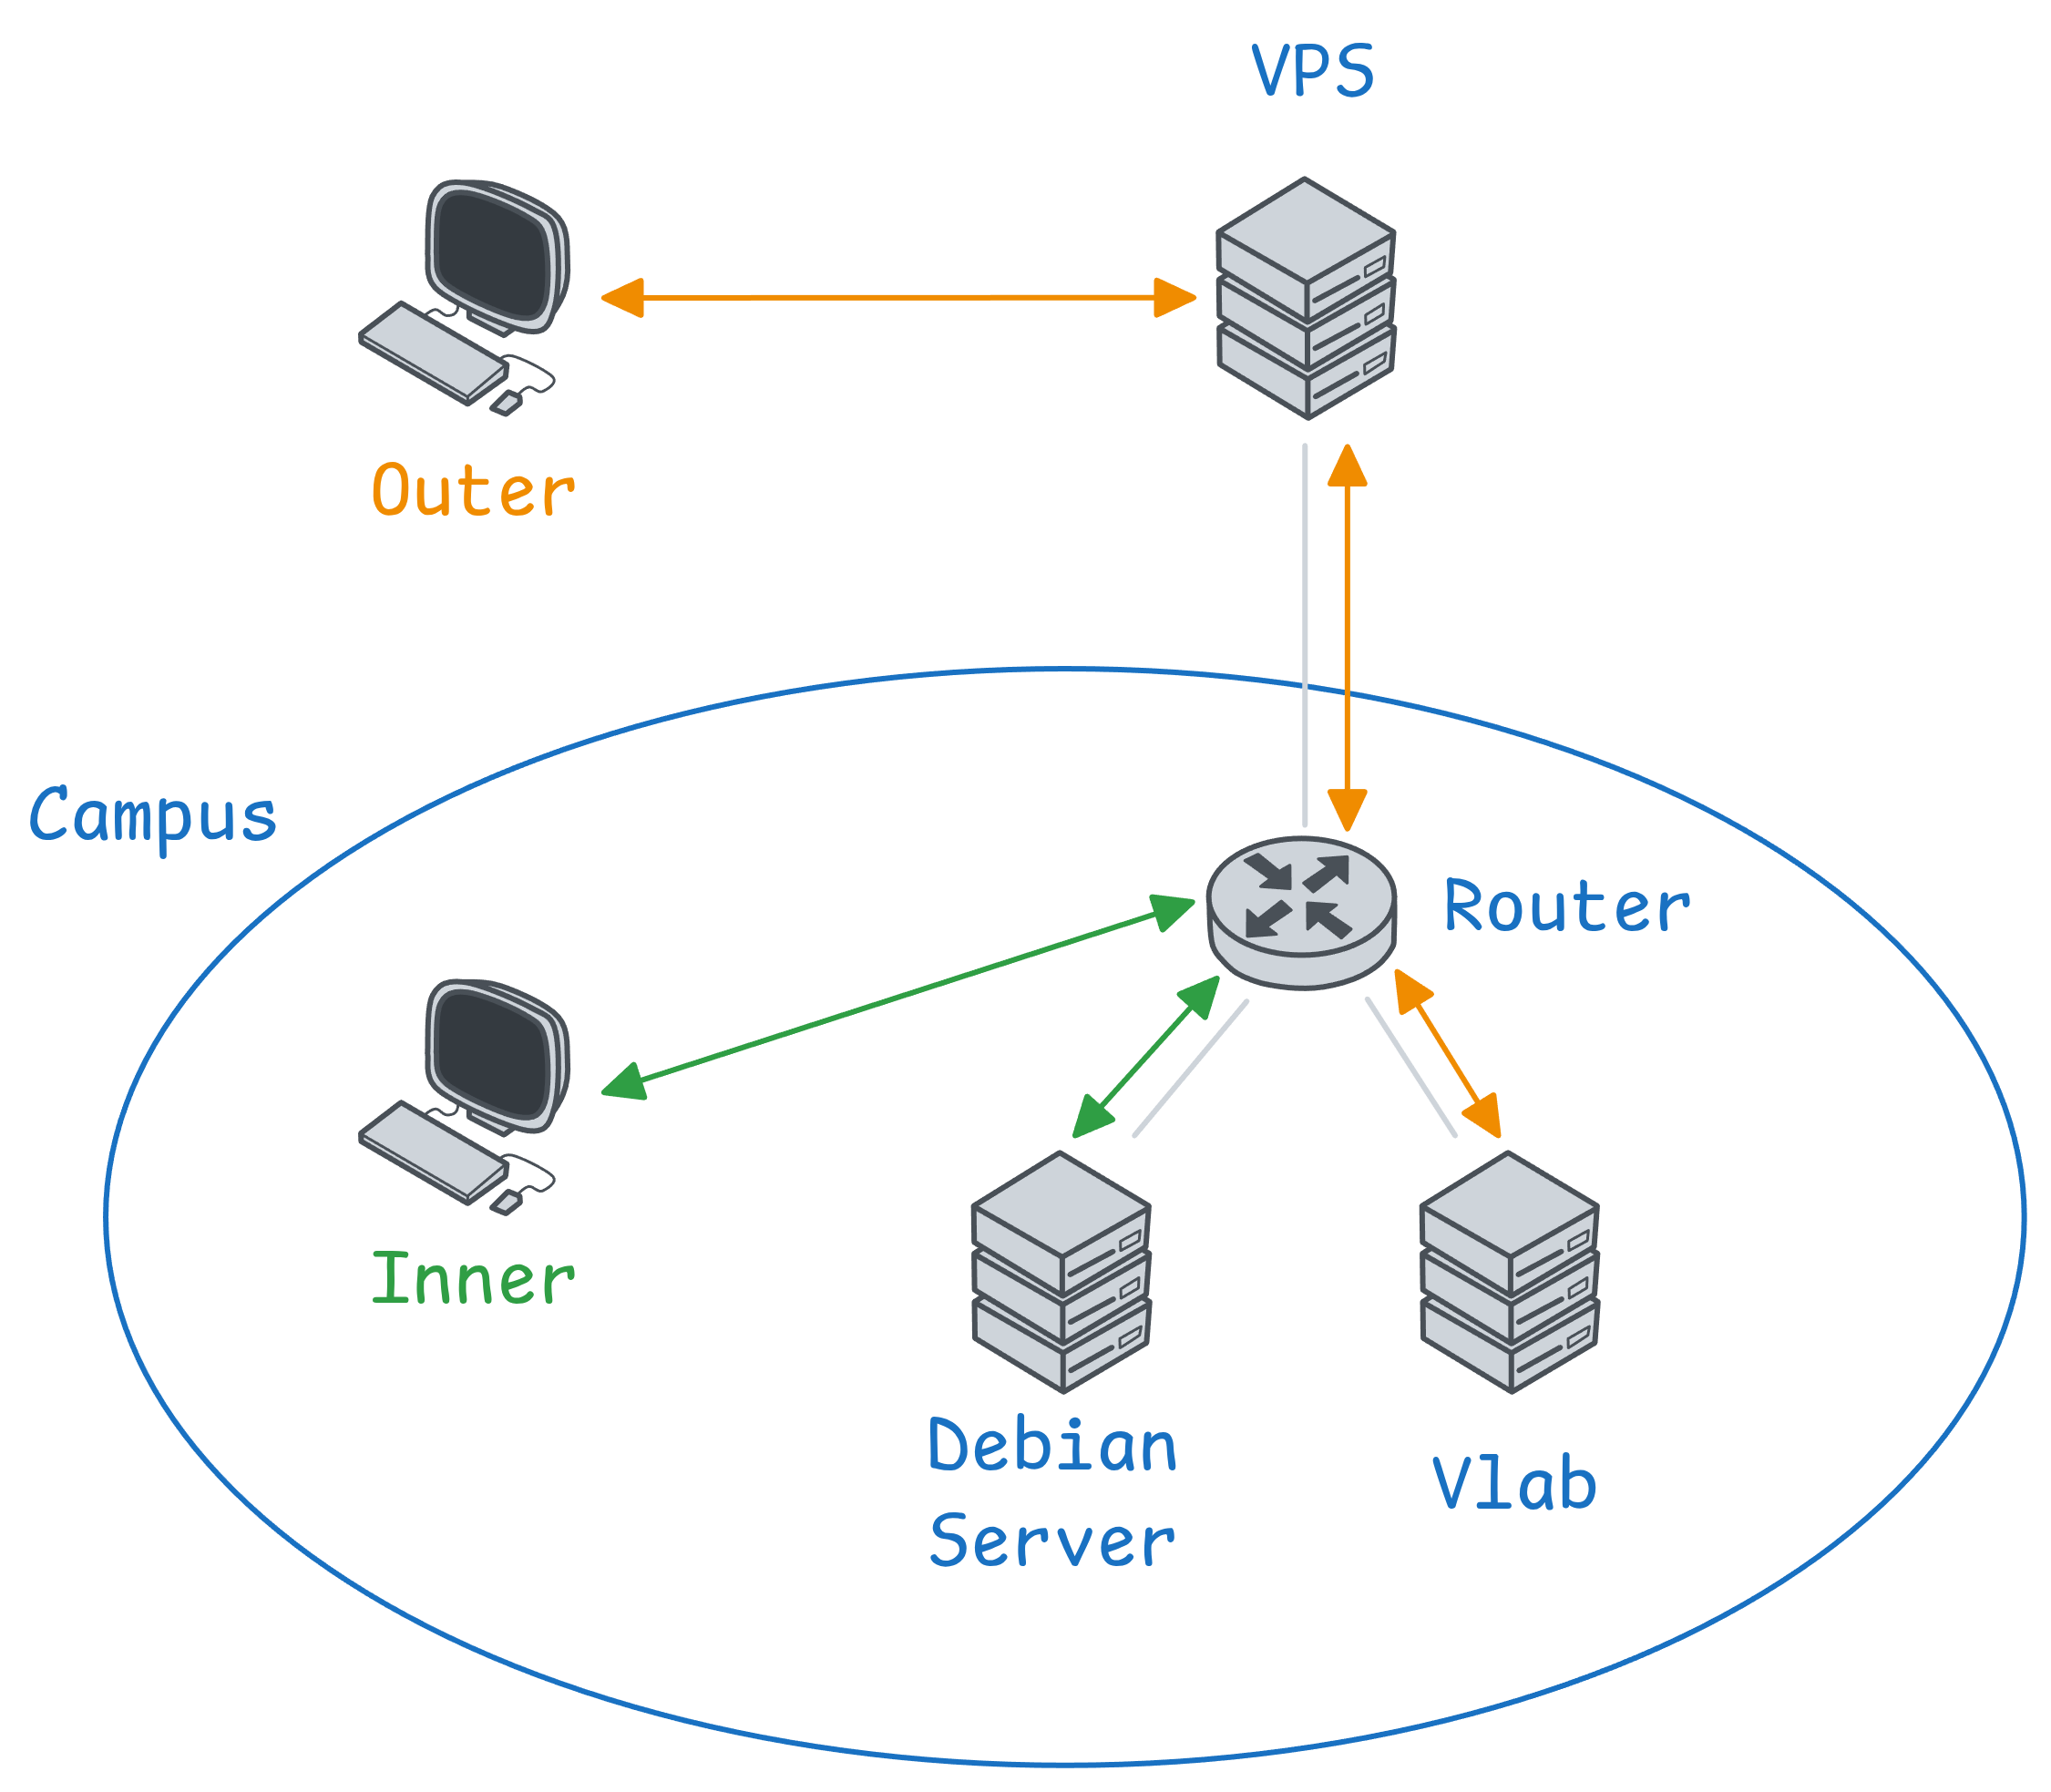
说句题外话,本文线路优化的实现主要由 qwen3.8-27b 负责(因为 gpt-6-astra 实在是太贵了),我主要负责在服务崩溃情况下的兜底和恢复。我觉得 qwen 这个 dense 小模型真的无敌了,在显存容量和带宽有限的情况下,单 session 的推理速度能达到 100tps,虽然模型总是输出雷霆大思考,但是实际实施的效果确实非常好,并且写代码的格式规范也远比 gpt-6-astra 好很多,今后要是 qwen 出了 4.0 的 dense 小模型,我应该也会接着支持的!
实现
通常来说,实现这样的分流机制有两种方案:
- 在校内网关路由器上做 DNS 拦截或者自定义 DNS 服务器,重定向到校内 Router 即可
- 在 VPS 上检测 IP 是否属于校内,选择是否将用户 302/307 临时转发到校内 Router
第一种方案需要我能够修改所有客户端的 DNS,或者要求设备只能在我的路由器下工作,这不仅麻烦,而且实际上做不到,因为我的服务不仅面向我自己,还面向其他人。
因此,毫无疑问,我必须选择使用第二种方案。
初步配置
首先,由于我的 VPS 暴露的服务基本上都是放在 Cloudflare 后面的,因此,我们需要首先在 nginx 中配置将真实请求的 IP 给还原出来。这主要有两种实现方式:
Proxy Protocol —— 专用的传输层代理协议,支持 TCP 和 UDP,针对性解决的就是类似于 Cloudflare 反向代理情况下真实应用无法得知真实请求 IP 的问题
- 优点:运行在传输层上,对于任何 TCP 和 UDP 负载都能够正确使用,而且只会在反向代理和真实应用之间传递,客户端无法伪造
- 缺点:需要双方额外约定配置,而且最重要的是,Cloudflare 免费版不支持,只有企业版支持
直接从请求头的 X-Forwarded-For 字段中提取真实 IP
- 优点:通用,可读性好,方便配置
- 缺点:只能用于 HTTP 协议,并且客户端可伪造
因为我只有免费版的 Cloudflare,因此我只能选择第二种,但是为了防止客户端伪造字段,我需要配置只有来自 Cloudflare 的 CDN 的 IP是可信的,可以用于替换真实 IP:
### /etc/nginx/snippets/cloudflare-real-ip.conf
# IPv4
set_real_ip_from 103.21.244.0/22;
set_real_ip_from 103.22.200.0/22;
set_real_ip_from 103.31.4.0/22;
set_real_ip_from 104.16.0.0/13;
set_real_ip_from 104.24.0.0/14;
set_real_ip_from 108.162.192.0/18;
set_real_ip_from 131.0.72.0/22;
set_real_ip_from 141.101.64.0/18;
set_real_ip_from 162.158.0.0/15;
set_real_ip_from 172.64.0.0/13;
set_real_ip_from 173.245.48.0/20;
set_real_ip_from 188.114.96.0/20;
set_real_ip_from 190.93.240.0/20;
set_real_ip_from 197.234.240.0/22;
set_real_ip_from 198.41.128.0/17;
# IPv6
set_real_ip_from 2400:cb00::/32;
set_real_ip_from 2606:4700::/32;
set_real_ip_from 2803:f800::/32;
set_real_ip_from 2405:b500::/32;
set_real_ip_from 2405:8100::/32;
set_real_ip_from 2a06:98c0::/29;
set_real_ip_from 2c0f:f248::/32;

real_ip_header X-Forwarded-For;
### /etc/nginx/nginx.conf
# ...
http {
# ...
include /etc/nginx/snippets/cloudflare-real-ip.conf;
include /etc/nginx/conf.d/*.conf;
include /etc/nginx/sites-enabled/*.conf;
}
# ...接着,在对应的 site 的配置文件内,配置 307 转发,并且在目标服务器配置接收。这部分我使用的方案是通配符域名,即任意 *.vertsineu.top 的请求都会到达 VPS 上,然后通过 307 转发到 *.public.vertsineu.top 上,接着 *.public.vertsineu.top 域名的请求会打到校内 Router 上,最后通过动态解析通配的部分还原成 *.vertsineu.top 反向代理给真实应用。这样的好处就是,我只需要配置单个 xxx.vertsineu.top 的 CNAME/A 记录到 VPS 上就行,无需再配置一条额外的 xxx.public.vertsineu.top 的 CNAME/A 记录。
在 VPS 侧,配置如下所示:
### /etc/nginx/sites-available/campus-redirect.conf
geo $remote_addr $is_campus {
    default 0;

    # CERNET
    114.214.160.0/19   1;
    114.214.192.0/18   1;
    202.38.64.0/19     1;
    210.45.64.0/20     1;
    210.45.112.0/20    1;
    211.86.144.0/20    1;
    222.195.64.0/19    1;

    # Telecom
    210.72.22.0/24     1;
    202.111.192.24/29  1;
    202.141.160.0/19   1;
    218.22.21.0/27     1;
    218.22.22.160/27   1;

    # Unicom
    218.104.71.96/28   1;
    218.104.71.160/28  1;

    # Mobile
    # 202.141.176.0/19   1; # weird, duplicated with Telecom
    121.255.0.0/16     1;

    2001:da8:d800::/48 1;   # CERNET
    2400:b600::/32     1;   # CNNIC
}

map $host $host_wants_redirect {
    default 0;
    xxx.vertsineu.top 1;
}

map "$is_campus:$host_wants_redirect" $do_redirect {
    default 0;
    "1:1" 1;
}

# for websocket
map $http_upgrade $connection_upgrade { default upgrade; '' close; }

server {
    listen 443 ssl default_server;
    listen [::]:443 ssl default_server;
    http2 on;
    server_name ~^.+\.vertsineu\.top$;

    ssl_certificate     /etc/ssl/certs/vertsineu.top.crt;
    ssl_certificate_key /etc/ssl/private/vertsineu.top.key;

    location / {
        if ($host ~* ^([^.]+)\.vertsineu\.top$) { set $svc $1; }

        if ($do_redirect) {
            return 307 https://$svc.public.vertsineu.top$request_uri$jwt_query;
        }

        proxy_pass https://$backend_443;
        proxy_ssl_server_name on;
        proxy_ssl_name $host;
        proxy_ssl_protocols TLSv1.2 TLSv1.3;
        proxy_ssl_verify off;

        proxy_set_header Host $host;
        proxy_set_header X-Real-IP       $remote_addr;
        proxy_set_header X-Forwarded-For $proxy_add_x_forwarded_for;
        proxy_set_header X-Forwarded-Proto https;

        proxy_http_version 1.1;
        proxy_set_header Upgrade    $http_upgrade;
        proxy_set_header Connection $connection_upgrade;

        proxy_cookie_domain ~^(?:[a-z0-9-]+\.)*vertsineu\.top$ .vertsineu.top;

        proxy_read_timeout 3600s;
        proxy_send_timeout 3600s;
    }
}
其中 $is_campus 顾名思义就是 USTC 所有校园网段,记录在校内的 git 仓库中,并且采取白名单制($host_wants_redirect)重定向指定服务,防止出现重定向不兼容问题。
在 Router 侧,配置如下所示:
### /etc/nginx/conf.d/public-proxy.conf
# for websocket
map $http_upgrade $connection_upgrade { default upgrade; '' close; }

server {
    listen 443 ssl;
    listen [::]:443 ssl;
    http2 on;
    server_name ~^(?<svc>[a-z0-9-]+)\.public\.vertsineu\.top$;

    ssl_certificate     /etc/ssl/certs/public.vertsineu.top.crt;
    ssl_certificate_key /etc/ssl/private/public.vertsineu.top.key;
    # for low mem usage
    ssl_session_cache shared:SSL:32k;
    ssl_session_timeout 64m;
    # for low disk usage
    access_log off;

    root /www;

    location / {
        proxy_pass https://$backend_443;
        proxy_ssl_server_name on;
        proxy_ssl_name        ${svc}.vertsineu.top;
        proxy_ssl_protocols   TLSv1.2 TLSv1.3;
        proxy_ssl_verify      off;

        proxy_set_header Host             ${svc}.vertsineu.top;
        proxy_set_header X-Real-IP        $remote_addr;
        proxy_set_header X-Forwarded-For  $proxy_add_x_forwarded_for;
        proxy_set_header X-Forwarded-Proto https;

        proxy_http_version 1.1;
        proxy_set_header Upgrade    $http_upgrade;
        proxy_set_header Connection $connection_upgrade;

        # for llm streaming and low cpu/mem usage
        proxy_buffering off;
        proxy_cache off;
        gzip off;

        proxy_cookie_domain ~^(?:[a-z0-9-]+\.)*vertsineu\.top$ .vertsineu.top;

        proxy_read_timeout 3600s;
        proxy_send_timeout 3600s;
    }
}
除了动态获取真实域名进行反代,还额外添加了一些减少资源占用的设置。
最后,apply 这些配置,理论上来讲,应该能够正常运行,而在浏览器内,也是正常运行的……但是很不幸的是,当我在校内使用我的自定义中转服务运行 Oh My Pi 时,报了一个 401 Unauthorized 错误,即使我设置对了正确的 api key。
最终配置
原理很简单,客户端在实现 307 跳转的时候,会自动丢弃原始请求头的 Authorization 字段,而 api key 则通常就放在 Authorization,比如 Authorization: Bearer sk-xxx,因此在 307 跳转后,只有未携带 api key 的请求落到了真实应用上去,导致返回 401 错误。解决方案依旧有很多:
- 客户端手动跟随重定向,把 Authorization 字段加回去
- 客户端不采用 Authorization 字段,而是采用比如 X-Api-Key 之类的自定义字段
- 307 返回的时候将 Authorization 字段里的内容打包成一个 query 字段放进 URL 里
但是想都不用想,我只能采取最后一种方法了,我总不能把每个软件的重定向逻辑或鉴权逻辑都重写一遍吧。通常来说,跨域请求使用的是 JWT 搭配 HS256 Signature,但是原生 nginx 肯定是不支持的,需要使用 nginx 的 lua 拓展,同时需要注意的是,JWT 默认是不带有加密的,所以不要在日志里把 JWT 暴露了,幸好,为了节省磁盘空间,Router 上的本来就配置了 access_log off。
在 VPS 侧,添加配置:
### /etc/nginx/sites-available/campus-redirect.conf
# ...

# JWT secret
map "" $jwt_secret { default "use `openssl rand -hex 32` to generate"; }

server {
  # ...
  location / {
        if ($host ~* ^([^.]+)\.vertsineu\.top$) { set $svc $1; }

        if ($do_redirect) {
            set_by_lua_block $jwt_query {
                local auth = ngx.var.http_authorization
                if not auth or auth == "" then return "" end
                local ok, token = pcall(function()
                    local jwt = require "resty.jwt"
                    local now = math.floor(ngx.now())
                    return jwt:sign(ngx.var.jwt_secret, {
                        header  = { typ = "JWT", alg = "HS256" },
                        payload = { auth = auth, iat = now, exp = now + 30, iss = "campus-redirect" },
                    })
                end)
                if not ok then
                    ngx.log(ngx.ERR, "jwt sign failed: ", token)
                    return ""
                end
                local sep = (ngx.var.args and ngx.var.args ~= "") and "&" or "?"
                return sep .. "jwt=" .. token
            }

            return 307 https://$svc.public.vertsineu.top$request_uri$jwt_query;
        }

        # ...
    }
}
在 Router 侧,添加配置:
### /etc/nginx/conf.d/public-proxy.conf
# ...

# JWT secret
map "" $jwt_secret { default "use `openssl rand -hex 32` to generate"; }

server {
    # ...
    location / {
        rewrite_by_lua_block {
            local final_auth
            local orig = ngx.var.http_authorization
            if orig and orig ~= "" then
                final_auth = orig
            else
                local jwt_str = ngx.var.arg_jwt
                if jwt_str and jwt_str ~= "" then
                    local ok, auth = pcall(function()
                        local jwt = require "resty.jwt"
                        jwt:set_alg_whitelist({ HS256 = 1 })
                        local obj = jwt:verify(ngx.var.jwt_secret, jwt_str, 5)
                        if obj and obj.verified then return obj.payload.auth end
                        return nil
                    end)
                    if ok then final_auth = auth end
                end
            end
            if final_auth then
                ngx.req.set_header("Authorization", final_auth)
            else
                ngx.req.clear_header("Authorization")
            end
            local args = ngx.req.get_uri_args()
            if args.jwt then
                args.jwt = nil
                ngx.req.set_uri_args(args)
            end
        }

        # ...
    }
}
顺便说一句,在我的 Router 上,从 ImmortalWrt 软件源下载的 nginx 没有编译进 lua 支持,更没有 JWT 的 lua 模块,因此我在我的机器上重新交叉编译了 nginx 目前的最新版 1.31.6,并添加了 JWT 的 lua 模块,位于 Vertsineu/nginx-router。这部分是在是非常折腾人,qwen3.8-27b 几乎花了半天时间才交付,C/C++ 项目和库的编译实在是折磨人,更别说是交叉编译了。
结语
至此,这份自适应重定向线路优化方案就已经能很好地 work 起来了,相比于之前直接通过 tailscale proxy_pass 到校内,目前的方案有以下优势:
- 链路稳定性:随着 nic 对于校园网对外的防火墙愈发严格,通过 tailscale 向学校内打洞的链路质量可能不如直接在校内直连;同时,跑在 Vlab 上的机器也时不时会因为链路不稳定导致 RTT 从 60ms 跳到 200-300ms,因此通过直连,校内访问时的链路稳定性得到了提升
- 链路延迟:从校内到我的 VPS 的 RTT 大概是 60ms,在此之前,使用 tailscale 打洞的话,整个链路延迟大概是 60ms + 60ms = 120ms;而现在,使用重定向的方式,每次访问仍需要首先访问 VPS 产生 60ms 的延迟,然后就是在校内直连,延迟约为 1ms,因此首请求延迟 61ms,之后的请求都是 1ms 左右,整个链路的延迟得到了降低。
- 链路带宽:从校内到我的 VPS 的带宽大概是 260Mbps,但是校内是 1Gbps,因此带宽得到了提升
不管怎么看,本线路优化方案只会带来纯收益,并且主要是大大提升了校内用户的体验。